How to Create Videos with Seedance 2.0: A Complete Guide
Seedance 2.0 is a popular AI video generator in 2026. Learn how to create cinematic videos and take control of the results.
Share
What Seedance 2.0 Can Do
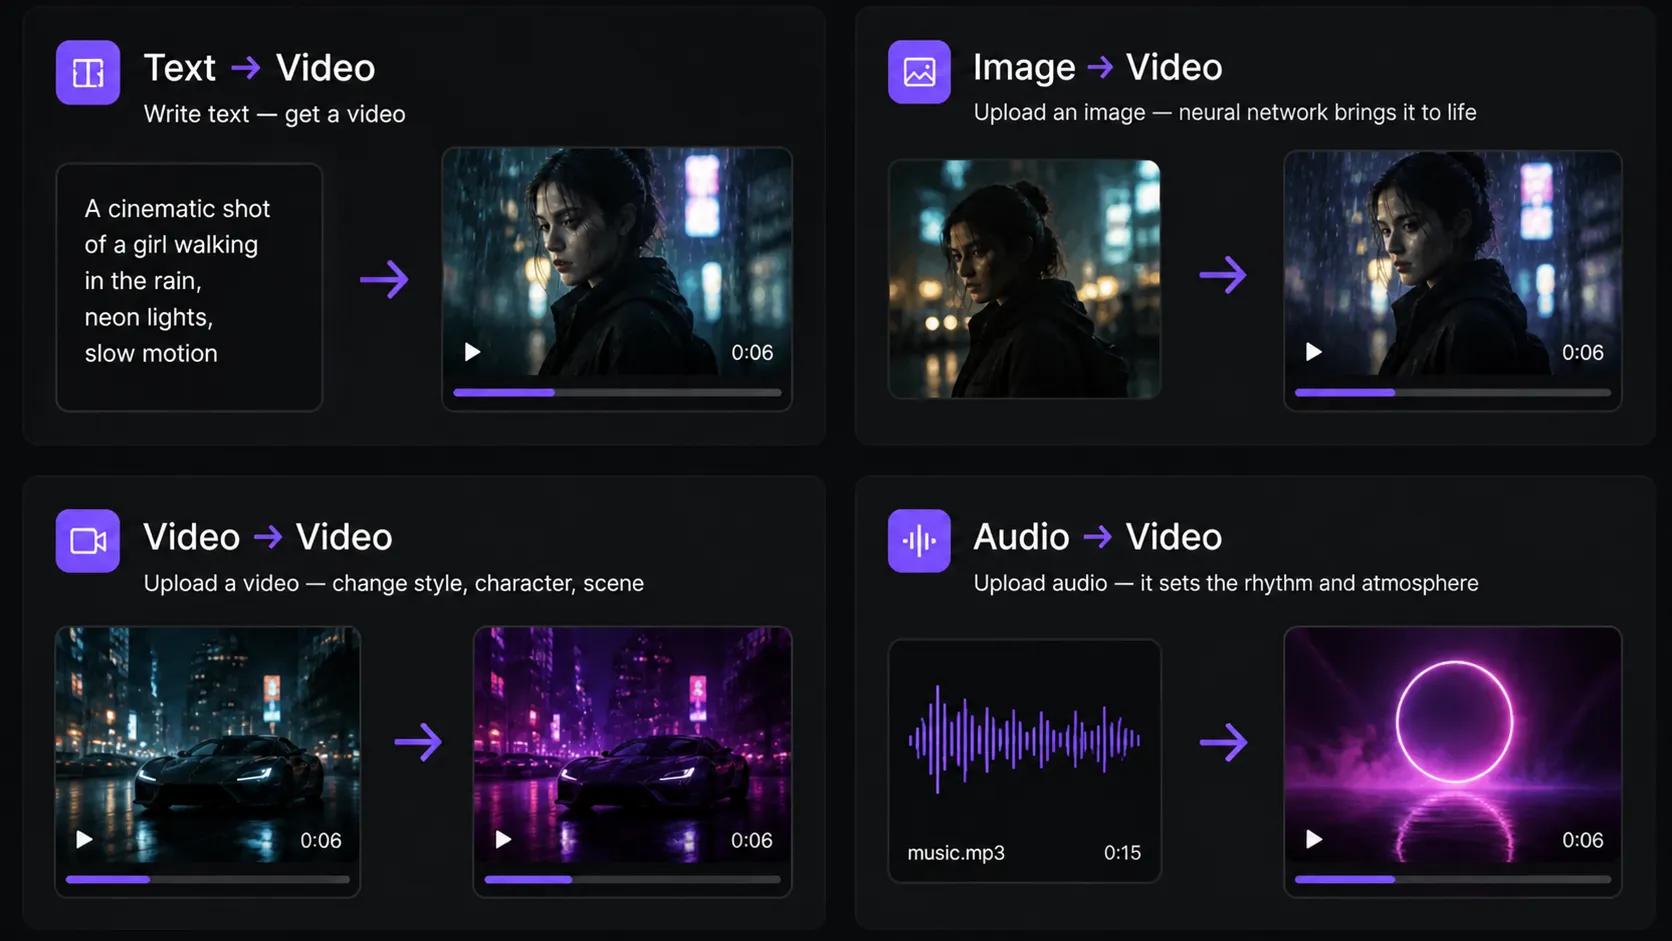
Seedance 2.0 is a multimodal AI that can work with different types of input, including text, images, video, and audio.
Seedance 2.0 is a powerful AI for video generation, but it still comes with a number of limitations you need to keep in mind.
First, videos created in Seedance 2.0 are typically between 4 and 15 seconds long. This means that for longer content, you’ll need to break your script into multiple scenes and generate them separately.
Second, like many AI video models, it can struggle with physical accuracy. Object and character movements may sometimes look unnatural or inconsistent, especially in complex, fast-paced scenes. In addition, when using text-to-video without reference inputs, character faces can “drift” — meaning their shape, details, or expressions may change from frame to frame.
To avoid these issues and achieve stable, high-quality results in Seedance 2.0, it’s important to use prompts, references, and generation settings correctly — we cover all of this in detail in our guide.
How to Access Seedance 2.0
There are several ways to access Seedance 2.0: through official access, web services, aggregators, and Telegram bots. However, the easiest, most accessible, and fastest option is to use the Play Profi platform — in the “Video Generation” section, where the tool is already available in a user-friendly interface and doesn’t require complex setup.
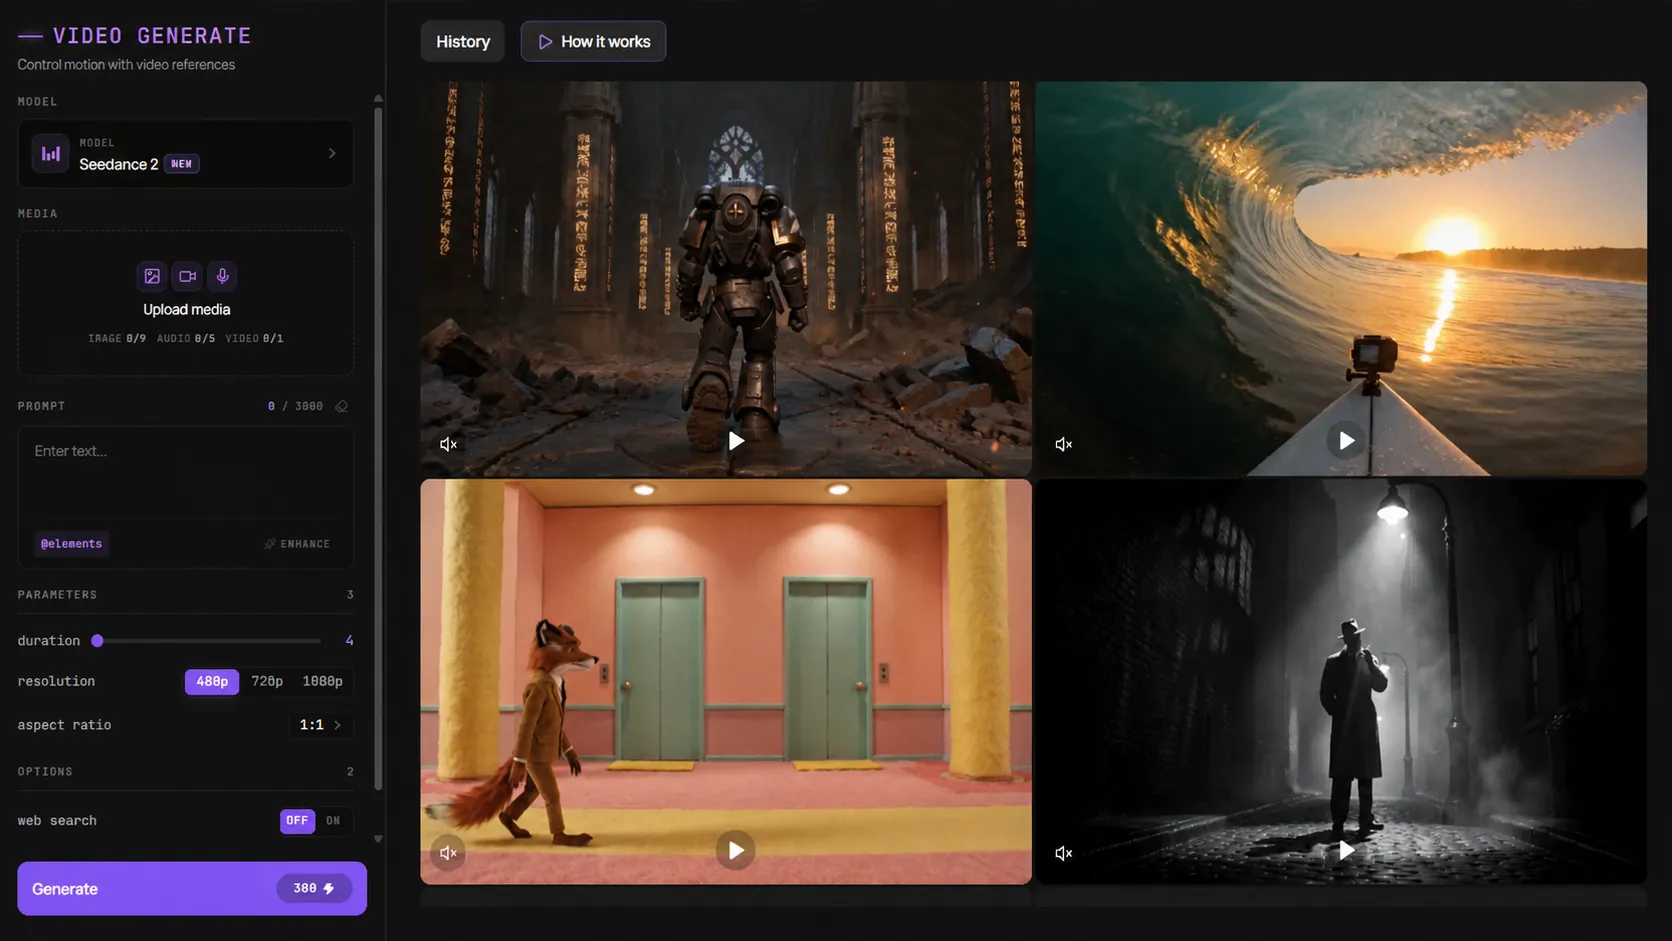
The Seedance 2.0 interface on the Play Profi platform is designed to be simple and intuitive: all the key video generation tools are located on a single screen and organized into clear sections.
On the left, you’ll find the main control panel. Here, the user selects the Seedance 2.0 model, uploads media files (images, video, or audio), and enters a text prompt describing the desired scene. This is the core block that directly determines the final result.
Below that are the generation settings. In Play Profi, you can control the video length, choose the resolution (such as 480p, 720p, or 1080p), and set the aspect ratio — square (1:1) or vertical/horizontal depending on your needs (for example, for TikTok or YouTube).
On the right side of the interface, the generated videos are displayed. Here, you can preview results, compare different versions, and download the best one. Clicking on a video opens a separate window with detailed information about it.
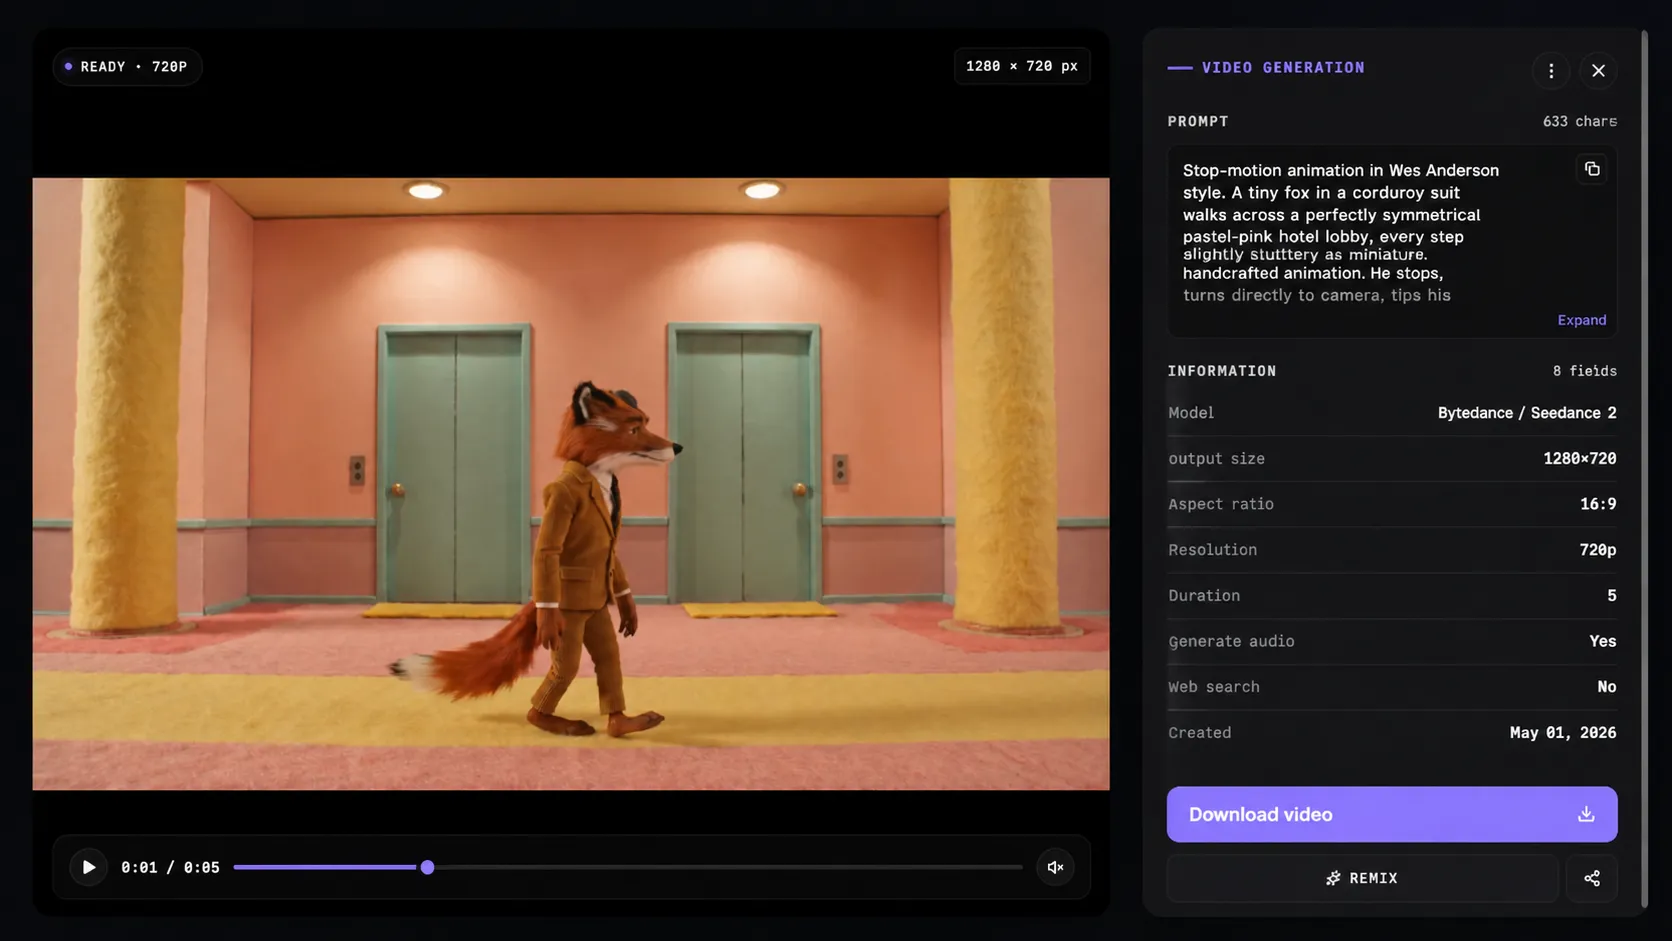
In this window, the user can see not only the video itself, but also all the parameters it was generated with. On the right, the original prompt is displayed, which makes it easy to analyze and refine the result. Below that, you’ll find the technical settings: model, resolution, aspect ratio, duration, and whether audio is included.
You’ll also find the main actions here — such as downloading the video or regenerating it (remix), which allows you to quickly improve the result without having to set everything up from scratch.
How to Use Seedance 2.0: Basic Prompting
In Seedance 2.0, like in any other AI model, the result depends almost entirely on the prompt. A good prompt isn’t just a description — it’s a way to control the scene.
The most common mistake beginners make is writing overly generic prompts like “a man walking.” In this case, the model fills in all the missing details on its own — and often does it poorly.
To avoid this, it’s important to understand how Seedance “reads” a prompt. It treats it as a sequence of instructions: first the scene and characters are defined, then the action, followed by the visual style, and only after that — how it’s shot (camera settings). If any of these elements are missing, the model fills them in automatically, and that’s where mistakes are most likely to happen.
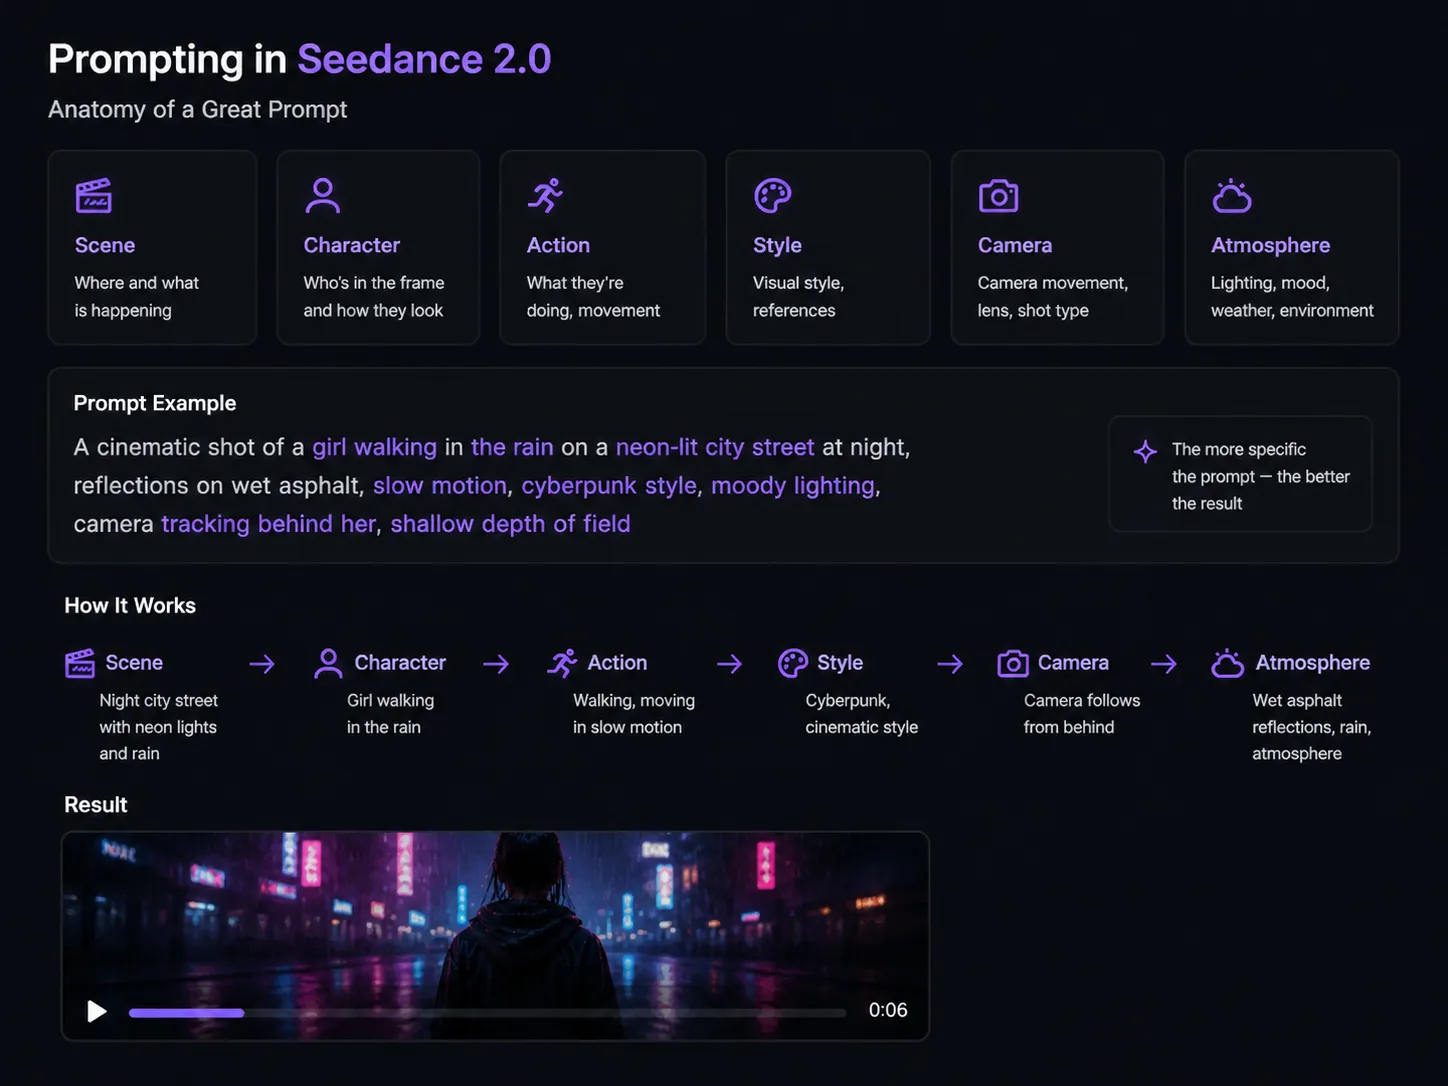
A good prompt should work like a short description of a movie shot. It includes context — where the scene takes place and who is in it — an action that drives the motion, and visual details like lighting, environment, and style.
Camera description plays a separate and important role, as it directly affects how the viewer experiences the scene — whether it’s a close-up, a tracking shot, or a static frame.
Below are several prompt examples that produce stable, high-quality results.
a cinematic shot of a man walking through a foggy forest at sunrise, soft light rays breaking through the trees, slow motion, calm atmosphere, camera slowly tracking behind him
a cinematic shot of a girl walking in a neon-lit cyberpunk city at night, reflections on wet asphalt, rain falling, slow motion, close-up, dramatic lighting, tracking shot
a futuristic soldier running through a destroyed city, explosions in the background, debris flying, intense action, handheld camera, fast motion, dramatic lighting
a cinematic product shot of a luxury watch on a black reflective surface, soft studio lighting, slow rotation, ultra detailed, close-up, depth of field
How to Gain More Control Over Results in Seedance 2.0
But even the best text prompt doesn’t give you full control over the result. Seedance 2.0 can follow your description accurately, but visual details — like a character’s face, style, or composition — are still partly left to the model.
That’s why references are used to achieve stable and predictable results. References are images, videos, or audio files that you upload alongside your prompt. Instead of just describing the scene in words, you’re showing the AI exactly what you want. Unlike text, which can be interpreted in different ways, visual inputs lock in key elements such as character appearance, style, color palette, and overall mood.
On the Play Profi platform, working with references is especially convenient thanks to the Elements system. It’s one of the key tools that gives you more control over generation in Seedance 2.0.
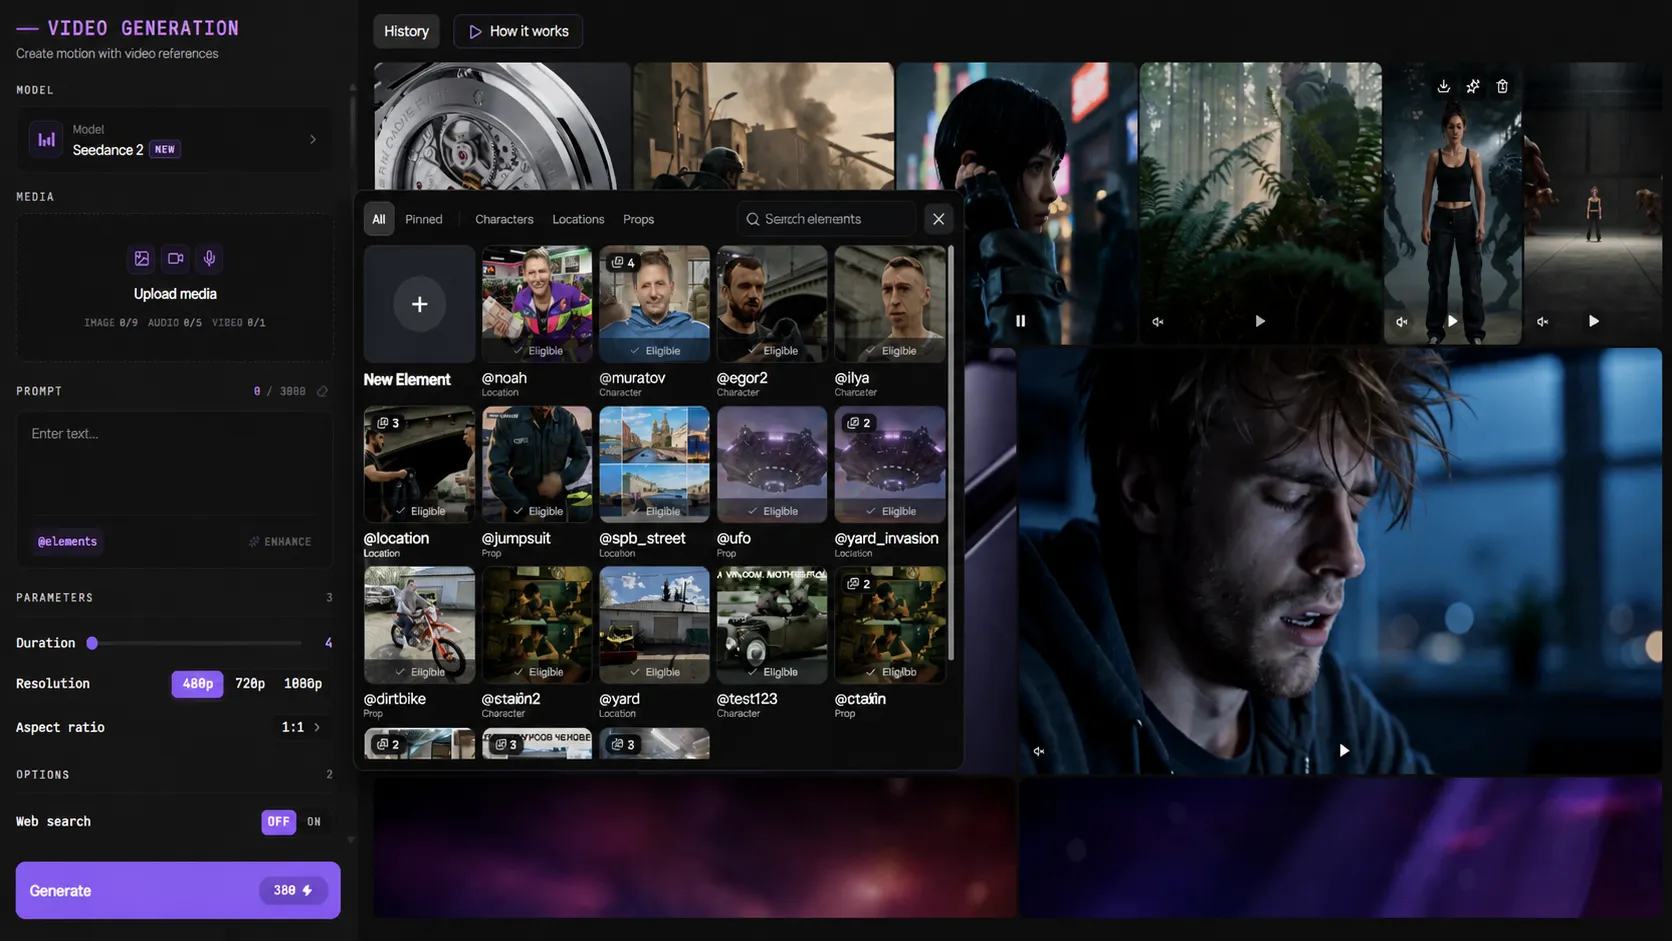
Elements let you create and save individual parts of a scene in advance — such as characters, locations, or props. You can upload images, assign them a name (using @reference), and add a description if needed. After that, the element is saved in your library and can be reused anytime.
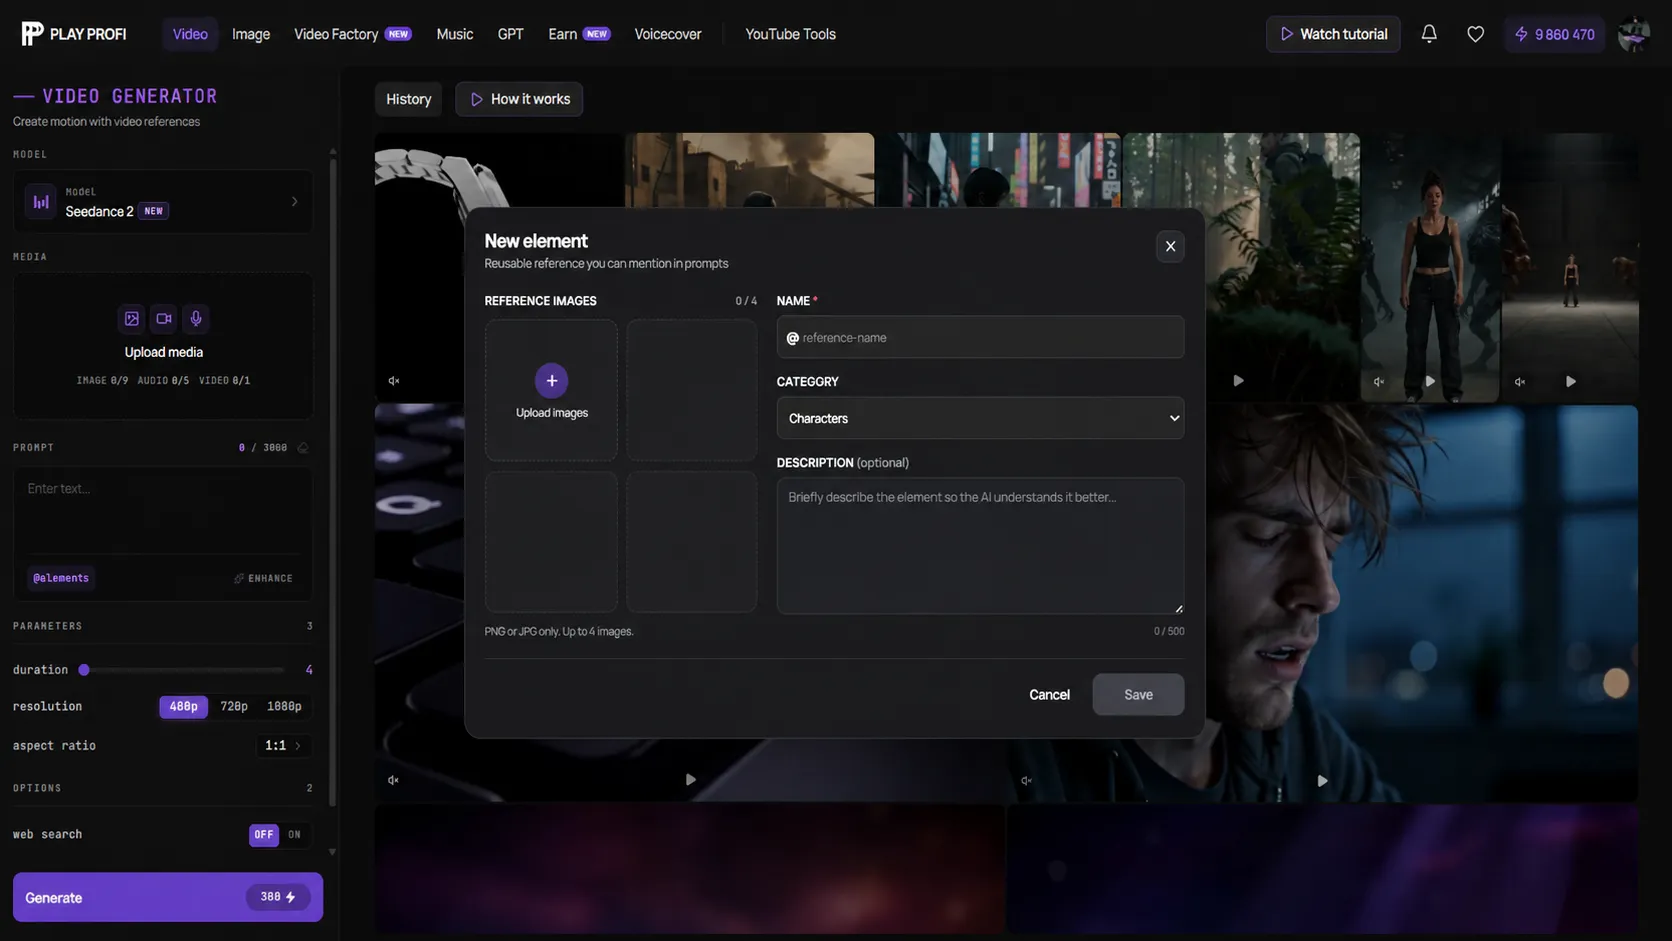
The main advantage of this approach is speed and consistency. Instead of describing a character or style from scratch every time, you can set up an element once and then simply reuse it in your prompts. This not only speeds up the workflow but also makes the results much more consistent.
Below is an example of a prompt using Elements:
a cinematic shot of @anna_character walking through @cyberpunk_city at night, neon lights reflecting on wet asphalt, rain falling, slow motion, camera tracking behind her, dramatic lighting
How does it work? In this prompt, @anna_character is a predefined character (appearance and style), @cyberpunk_city is a saved location, and the rest of the text defines the action, atmosphere, and camera. The result is a more stable and predictable output.
Advanced Prompting Techniques in Seedance 2.0
Once you understand the basics of prompting, the next step is gaining more precise control over the scene. In Seedance 2.0, you’re not just describing an image — you’re essentially directing the video through text.
One of the most powerful techniques is breaking a prompt into multiple scenes. Instead of giving a single general description, you can structure the action step by step: an initial state, a transition, and a final shot. This approach helps create more dynamic, lifelike videos that feel like a short sequence rather than a static clip.
a cinematic shot of @anna_character walking through @forest_location at sunrise, golden light rays through the trees, camera slowly tracking behind her, then slightly moving to the side revealing depth, soft focus, calm atmosphere
In practice, an even more effective approach is breaking the prompt down by seconds. Instead of simply describing a sequence of events, you define a clear timeline: what happens in the first few seconds, how the action evolves, and how the clip ends. This gives you much greater control over the pacing and helps avoid chaotic transitions within the video.
A second-by-second structure essentially turns your prompt into a mini script. The AI isn’t just receiving a description — it’s following a clear plan for how the scene should unfold. As a result, the output becomes more predictable, coherent, and cinematic.
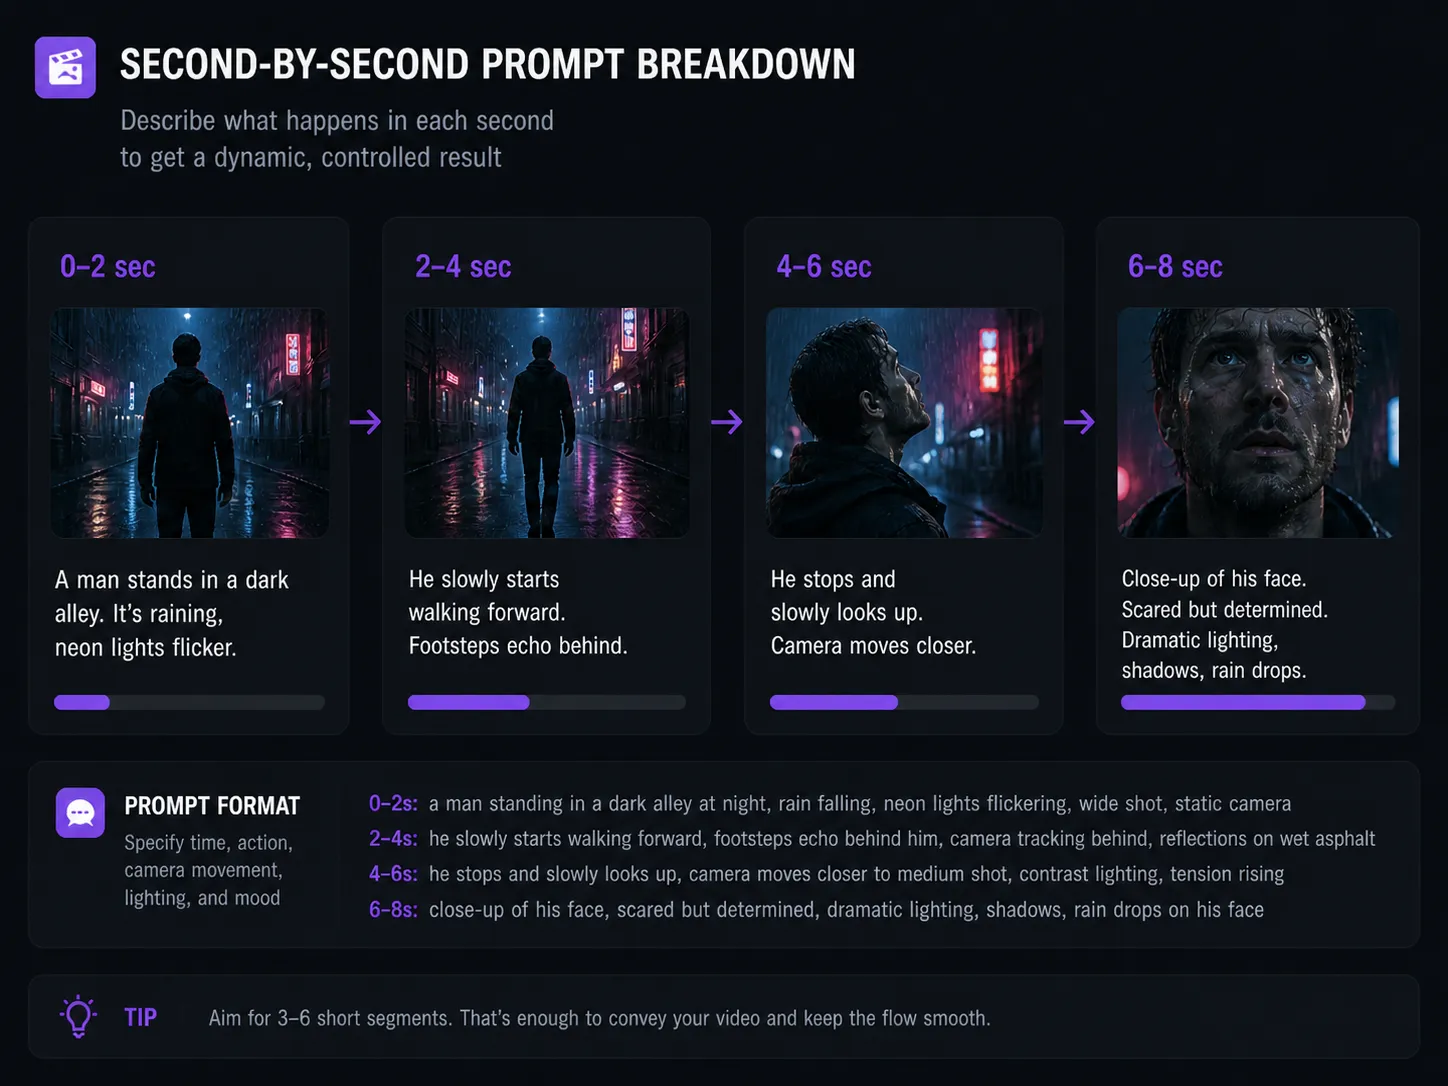
It quickly becomes clear that writing these kinds of prompts manually is quite challenging. You need to account for timing, actions, camera work, lighting, and atmosphere all at once — and phrase it in a way the model can properly understand.
That’s why the next step is using text-based AI tools (like ChatGPT, Claude, or Perplexity) to generate prompts. They help automate the process: you provide an idea or scenario, and the AI turns it into a structured, detailed prompt that Seedance 2.0 can easily interpret.
Prompting for Seedance 2.0 Using Text-Based AI
On the Play Profi website, all popular text-based AI tools are available directly on the platform — link. It’s a unified, self-contained ecosystem where you don’t need to switch between different services or chats — the entire video creation process, from idea to final result, happens in one place.
Below is a universal approach that works in most cases.
Step 1: Define the Video Idea
Start with a simple idea, not a prompt. It can be a very short description: a girl walking through a neon-lit city in the rain, a watch commercial in a dark studio, or a man standing alone in a forest at sunrise.
At this stage, there’s no need to overcomplicate things — the goal is simply to understand what you want to see in the video.
If you don’t have an idea, you can turn to a text-based AI right away. For example:
come up with 5 ideas for short videos for Seedance 2.0, each idea should be visually striking and cinematic
or
come up with 5 ideas for a product ad video with a cinematic feel and a strong focus on visuals
You can also ask for a more structured result:
come up with 3 ideas for short videos and briefly describe the scene, action, and atmosphere for each
Step 2: Give the AI a Clear Task
Once you have an idea, the next step is to turn it into a clear task for the AI. This is where the quality of your final prompt is determined.
A good approach is to use a universal request like:
generate a detailed prompt for Seedance 2.0 with a cinematic description, including camera, lighting, and atmosphere, with a second-by-second breakdown and scene dynamics
This kind of instruction gives the AI a clear understanding of what you need. As a result, you don’t just get a piece of text, but a fully structured prompt that’s ready to use for video generation.
Step 3: Add Elements
To get more stable and controllable results, the next step is working with Elements.
You can either ask the AI to suggest them:
add suitable elements (characters, locations, props) to this prompt
Or use your own pre-created elements:
insert the elements @anna_character and @cyberpunk_city into the prompt
As a result, the AI will integrate them directly into the prompt, helping lock in character appearance, style, and environment.
Step 4: Generate the Result
Once your prompt is ready, you can paste it into Seedance 2.0 and use it to generate the video.
If the result isn’t perfect, there’s no need to start from scratch — just go back to the previous steps and refine the prompt using a text-based AI: adjust the scene, improve the dynamics, or add more detail.
How to Create Longer Videos in Seedance 2.0
Once you’ve mastered the basics, you can move on to more complex workflows. At this level, Seedance 2.0 is no longer just a tool for generating standalone clips, but a way to create structured and controlled video content. However, it’s important to understand that these kinds of videos are almost never created in a single generation — in practice, they’re built from multiple scenes.
The process usually starts not with a prompt, but with planning the logic of the video. In practice, this means creating a simple structure — almost like a mini script: what happens at the beginning, how the action develops, and how the scene ends. This can be very minimal, for example: a character is standing still, then starts moving, and finally the camera moves in to capture their emotion. This approach helps define the sequence in advance and avoid chaotic transitions.
After that, each scene is generated separately. This is one of the key principles of working with Seedance 2.0: instead of trying to fit everything into one long prompt, you break the video into parts and create them step by step. This gives you much more control over the result, makes it easier to fix mistakes, and leads to more consistent quality.
The next — and most important — step is connecting the scenes together. For the video to feel cohesive, you need to maintain both visual and logical continuity. This is achieved by using the same characters (through Elements), keeping similar phrasing in your prompts, and ensuring a natural continuation of movement and composition. The end of one scene should smoothly transition into the beginning of the next — otherwise, the video will feel disconnected.
Since each clip has a limited length, creating longer scenes relies on a technique called continuation. The idea is to extend the existing action rather than start a new scene from scratch.
You take the final frame of the previous video as a reference and describe how that exact moment continues, keeping the same style, camera movement, and atmosphere. This approach allows you to “stitch” multiple generations together into one seamless video without abrupt transitions.
You can learn more about creating longer videos in Seedance 2.0 in this video.
Real-World Use Cases of Seedance 2.0
The tool is widely used for creating short videos for TikTok and Reels, ads, storytelling content, music clips, and previsualization in production — anywhere speed, strong visuals, and rapid idea testing matter. Seedance 2.0 makes it possible to control scenes, style, and dynamics, allowing you to produce high-quality visual content without complex or expensive production.
If you found this guide helpful, feel free to share it on social media — it will help others get up to speed with this new tool faster. Wishing you productive work with Seedance 2.0!
Explore the capabilities of this new AI video model right now